
Last Updated: October 22, 2026
Quick Summary
Signs of hidden roof leak damage include brown or yellow rings and streaks on ceilings and upper walls, bubbling or peeling paint, and dark discoloration on roof decking and rafters in the attic. Because water travels along rafters and insulation, these signs often appear far from the actual entry point. Mark and date each stain, then trace the water path uphill toward vents, chimneys, skylights, and flashing.
- Water rarely drips straight down, so hidden roof leak signs often show up far from the entry point.
- A ring with a darker outer edge usually means water has soaked and dried more than once.
- Mark and date the stain with painter’s tape to measure growth after the next rain.
- Run a controlled hose test starting at the lowest suspect point and move uphill in short increments.
- Stains that grow on dry days point to plumbing or HVAC rather than the roof.
Table of Contents
- Interior Signs of Roof Damage: What Your Ceiling and Walls Reveal
- How to Detect a Roof Leak: A Step-by-Step Leak-Tracing Method
- Attic Inspection: Dark Discoloration on Roof Decking and Rafters
- Exterior Warning Signs: Missing Shingles, Flashing Problems, and Sagging Areas
- Your Roof Leak Damage Checklist for Documentation and Insurance
- What to Do When You Find a Roof Leak: Immediate Steps and Safety Limits
- Frequently Asked Questions
Interior Signs of Roof Damage: What Your Ceiling and Walls Reveal
A hidden roof leak is water intrusion that starts at the roof and travels through your home’s structure before it shows up inside.
Water rarely drips straight down. It follows rafters, insulation, and drywall before it finds a way out. That’s why the signs of hidden roof leak damage show up far from the actual entry point.
Below, we’ll walk through what to look for, how to trace a leak back to its source, and when to call for help.
Ceiling and Wall Water Stains, Rings, and Streaks
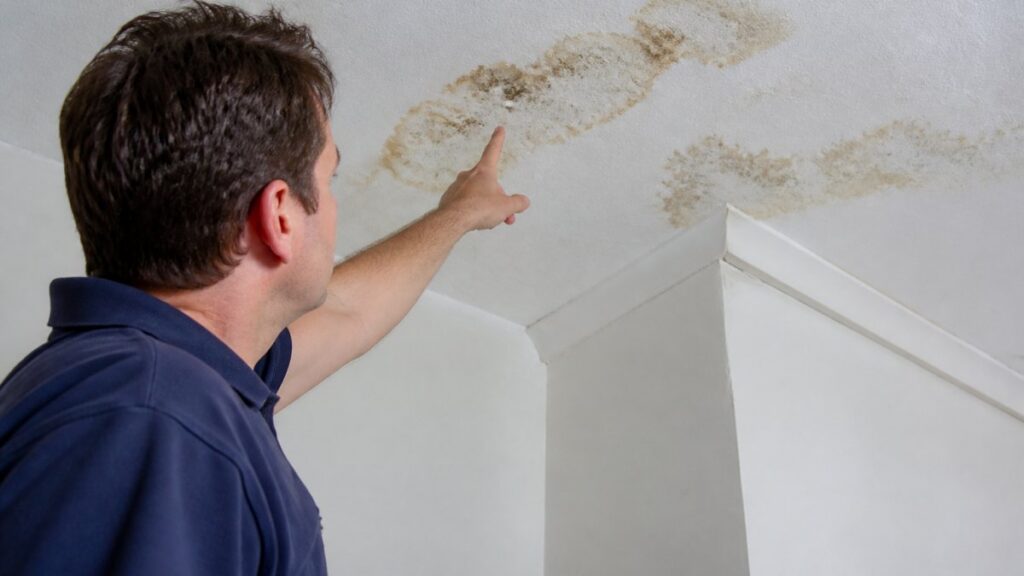
Water stains are the most common interior sign of roof damage. Look for brown or yellow rings, discolored patches, or dark streaks on ceilings and upper walls.
A ring with a darker outer edge usually means water has soaked and dried more than once. That’s a repeating leak, not a one-time event.
Check these spots first:
- Ceiling corners and edges near exterior walls
- Around ceiling fixtures and vents
- Top-floor closet ceilings
- Wall sections directly below roof valleys
A common mistake is painting over a stain. It hides the evidence and lets the leak keep working. It also weakens a future insurance claim, because adjusters look for documented damage history.
Peeling, Bubbling, or Blistering Paint
Paint that bubbles, blisters, or peels without a clear cause points to moisture behind the surface. Water gets between the paint and the drywall, and the paint loses its grip.
This sign matters because it often appears before a stain does. Run your hand along suspect walls. A soft, spongy feel means the drywall is wet.
Watch for paint that peels in a straight line or concentrated patch. That pattern usually traces back to a roof penetration or flashing gap above.
Never ignore bubbling paint near a ceiling line. It often means water is pooling above the drywall, and the ceiling can sag or collapse without warning.
How to Detect a Roof Leak: A Step-by-Step Leak-Tracing Method
Detecting a roof leak starts inside, not on the roof.
Here is the method most experienced inspectors follow:
- Mark and date the stain. Outline the visible edge with painter’s tape and write the date on the tape. This gives you a baseline to measure growth against after the next rain.
- Map the attic above the stain. Enter the attic during or shortly after a rain if it is safe to do so. Look for wet decking, active drips, or dark trails on the sides of rafters. Water running down a rafter often leaves a distinct dark line on one face.
- Follow the trail uphill. Water runs downhill along wood, so work back toward the ridge from the lowest wet point. Check the top and bottom edges of rafters, not just the faces.
- Inspect every penetration along the path. Vents, chimneys, skylights, pipe boots, and satellite mounts are the most common entry points. Look for cracked collars, lifted flashing, or missing sealant.
- Run a controlled hose test. Have a helper on the roof run a low stream of water at the lowest suspect point first, while you watch inside. Give it five to ten minutes to travel. If nothing shows, move the water uphill in short increments. Starting low and working up prevents water from a higher point masking the real entry.
- Photograph and log each step. Date-stamped photos of the stain, the attic trail, and the suspected penetration create a record that is useful for both repairs and an insurance claim.
The hose test is the fastest way to confirm a suspected entry point, but it has limits. It will not reproduce wind-driven rain that pushes water sideways or upward under flashing.
A common pattern is a stain that appears far from the actual opening. A leak at a chimney flashing can travel twenty feet along a rafter before it drips onto a ceiling in another room.
If you cannot safely enter the attic or get on the roof, stop at step 1. Marking and dating the stain is still valuable evidence, and a professional can complete the trace.
Distinguishing Roof Leaks from Plumbing, Condensation, and HVAC Moisture
Not every ceiling stain comes from the roof.
Plumbing leaks usually sit near bathrooms, kitchens, or supply lines.
Condensation shows up as fogged windows, damp attic sheathing, or frost on the underside of roof boards in cold months.
HVAC moisture collects near air handlers and ductwork. Look for dripping near equipment or wet spots under ceiling vents.
A simple timing test narrows the source quickly:
- Stains that spread during or right after rain point to the roof.
- Stains that grow on dry days point to plumbing or HVAC.
- Stains that appear in cold weather with no rain point to condensation.
If two or more sources are possible, document each one separately.
Attic Inspection: Dark Discoloration on Roof Decking and Rafters
Dark discoloration on roof decking and rafters is one of the clearest signs of a hidden roof leak.
Schedule your FREE Claim Consultation today →
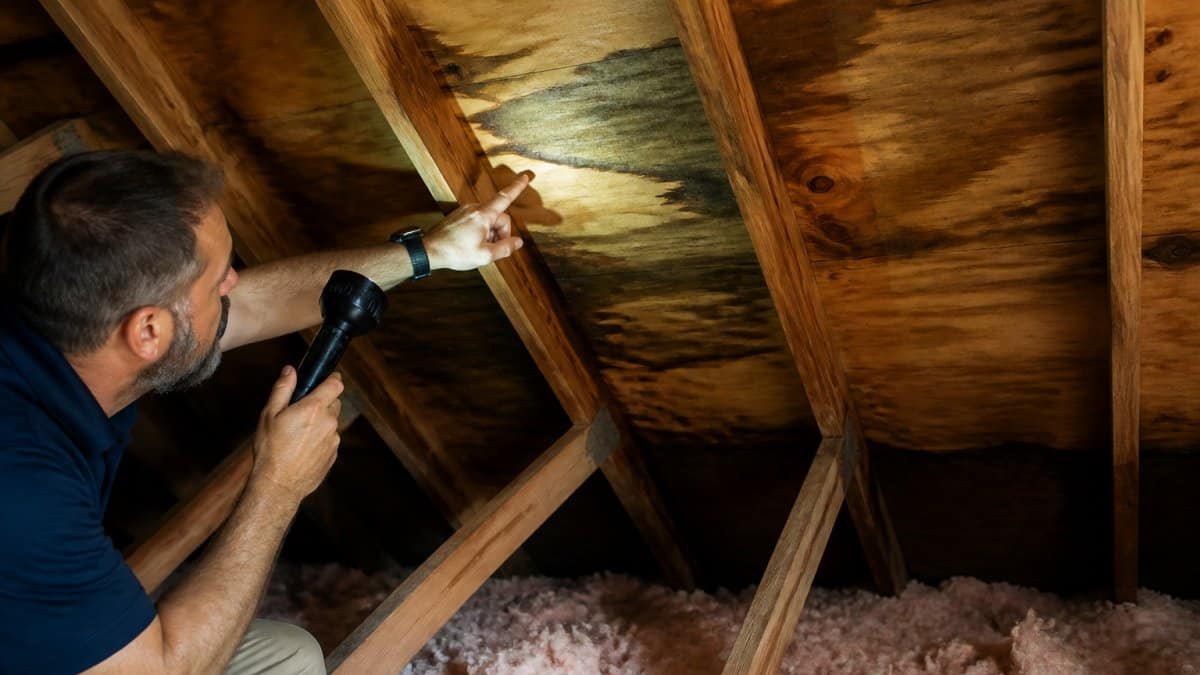
Bring a flashlight, a moisture meter if you have one, and your phone for photos. Check these areas in this order:
- The underside of roof decking, especially near valleys, chimneys, and pipe penetrations. Look for dark patches with a defined edge, a hard edge usually means repeated wetting and drying.
- Rafter edges and wood supports for dark streaks running lengthwise. Water travels along the grain, so a streak on a rafter often points uphill toward the entry.
- Insulation for damp, compressed, or matted patches. Wet insulation loses its ability to insulate and often sits directly below the leak.
- Exposed nail tips for rust. Moisture in the decking rusts nails from the inside out, and rusted tips are a quiet but reliable clue.
- Daylight showing through the roof boards. Pinpoint light means a gap, though a gap is not always the leak source.
A moisture meter adds a layer most visual inspections miss. Take readings at the dark patch, at nearby dry decking, and at the insulation below.
Photograph each finding with the date visible.
If you find soft or crumbly wood, stop probing. That is wood rot, and it needs a professional assessment.
Attics are hazardous. Watch for exposed nails, loose insulation, and hot surfaces. If the attic is wet, cramped, or has no safe walking path, inspect from the hatch with a flashlight and leave the rest to a professional.
A common pattern is discoloration that appears in a line across several rafters. That usually means water is running along a single path above the decking and dripping at multiple points below. The line points toward the entry, which is often a flashing detail rather than a missing shingle.
Exterior Warning Signs: Missing Shingles, Flashing Problems, and Sagging Areas
Exterior clues confirm what you suspect inside.
Flashing is the metal that seals roof penetrations and wall junctions. Bent, rusted, or lifted flashing lets water slip behind it.
Sagging areas are the most serious exterior sign. A dipped roofline or a sagging ceiling inside points to structural damage from long-term water intrusion.
Also check drainage systems. Clogged gutters push water under shingles and along the fascia, which can mimic a roof leak.
Photograph your roof from the ground after every major storm. Comparing photos over time makes it easy to spot new shingle damage before it becomes a leak.
Your Roof Leak Damage Checklist for Documentation and Insurance
A roof leak damage checklist keeps your evidence organized for both repairs and your insurance claim. Insurers respond to clear, dated records.
Use this checklist:
- Date-stamp photos of every stain, before and after rain
- Photos of attic decking, rafters, and damp insulation
- Ground-level photos of missing shingles or flashing damage
- A written log of when each sign appeared
- Receipts for temporary repairs or tarping
- Copies of your policy and any claim correspondence
- A moisture reading if a contractor provides one
Documentation matters because insurers often dispute causation. They may call damage “wear and tear” instead of storm-related. Strong records make that harder.
At Barclays Public Adjusters, our team builds this documentation into every claim strategy. We evaluate your policy, organize the evidence, and negotiate directly with your insurer.
What to Do When You Find a Roof Leak: Immediate Steps and Safety Limits
When you find a roof leak, act fast but stay safe. Stop the water, protect your belongings, and document the damage before you repair anything.
Immediate steps:
- Place buckets under active drips and move furniture clear.
- Poke a small drain hole in a bulging ceiling to release trapped water.
- Turn off power to wet ceiling areas at the breaker.
- Tarp the roof area if it’s safe from the ground.
- Photograph everything before cleanup.
- Call your insurer and a licensed roofer.
Never climb a wet roof. Water, moss, and loose shingles make falls likely, and the risk isn’t worth it.
When to Call a Professional
Call a professional when the leak is active, the damage is widespread, or your claim has been denied or underpaid. Safety limits are real: sagging ceilings, wet electrical fixtures, and soft roof decking all require expert handling.
A licensed roofer finds and fixes the source. A public adjuster handles the claim side. If your insurer has delayed, denied, or lowballed your roof leak claim, that’s where we come in.
Frequently Asked Questions
What are the signs of a hidden roof leak?
Look for ceiling or wall water stains, rings, or streaks; peeling, bubbling, or blistering paint; damp or compressed attic insulation; dark discoloration on roof decking and rafters; rust on exposed nail tips; and daylight visible through the roof. Exterior clues include missing or damaged shingles, flashing problems, and sagging areas. Any one of these signs warrants a professional inspection.
How can you tell if water damage on a ceiling is from a roof leak?
Roof leaks often create irregular stains with concentric rings and appear near exterior walls or under roof valleys. Plumbing leaks usually produce localized, steady drips near fixtures, while condensation tends to cause widespread dampness without distinct rings. To confirm, trace the water pathway from the stain upward to the roof deck. A moisture meter and attic inspection can help differentiate. If you’re unsure, document the damage and consult a public adjuster before filing a claim.
What should you do when you find a roof leak?
First, contain the water with buckets and towels, and move valuables away. Do not climb onto the roof yourself; safety limits mean you should call a licensed roofer for exterior inspection. Document everything with photos and notes, then contact your insurance company. Keep receipts for temporary repairs. In South Florida, consider hiring a public adjuster to evaluate your policy and negotiate a fair settlement, especially if the insurer denies or undervalues the claim.
How quickly should you address a suspected roof leak?
Act within 24 to 48 hours. Delays allow water to spread, causing wood rot, mold growth, and structural damage that may not be covered by insurance. Immediate steps include containing the leak and calling a professional. Document the damage before making temporary repairs. If your claim is delayed or denied, a public adjuster can help push for a timely resolution. Prompt action also strengthens your insurance claim by showing mitigation efforts.
A hidden roof leak rarely stays hidden for long, and the damage grows with every storm. If you’ve spotted stains, damp attic wood, or missing shingles, don’t wait for the next rain to make it worse. Barclays Public Adjusters offers licensed public insurance adjusters, a No Recovery, No Fee policy, and direct negotiation with your insurance company. Schedule your FREE Claim Consultation today and let our team secure the settlement you’re owed.